
Build your own 3D-printed geocache: Your unique hide
Damp logbooks, poorly disguised containers, hides that fail after just a few weeks. Every active geocacher knows this. Classic film canisters or store-bought plastic containers are practical, but rarely truly convincing. This is where 3D printing comes in: with the right material, suitable settings, and a good idea, you can create hides that last for years, blend perfectly into their surroundings, and truly delight finders. In this tutorial, you'll learn everything you need to plan, print, and successfully place your own 3D-printed geocache.
Table of Contents
- What You Need for 3D Printing Your Geocache
- From Idea to STL File: How to Plan Your Geocache
- Print Settings and Pro Optimization for Robust Geocaches
- Camouflage and Customization: More Than Just Appearance
- Learning from Mistakes: Typical Problems and Their Solutions
- What Really Matters in 3D Printing Geocaches: Our Experience
- Want More? Discover Professional 3D Geocaches and Accessories
- Frequently Asked Questions About 3D Printing Geocaches
Key Takeaways
| Point | Details |
|---|---|
| Material choice is crucial | Opt for PETG for durable, robust outdoor geocaches. |
| Strictly adhere to rules | Follow geocaching guidelines to avoid archiving and trouble. |
| Correct print parameters ensure success | Layer height, infill, and perimeters determine weather resistance and durability. |
| Design camouflage naturally | Use real textures and colors to best conceal your cache. |
| Error analysis extends lifespan | Learn from mistakes, continuously optimize, and test in real-world conditions. |
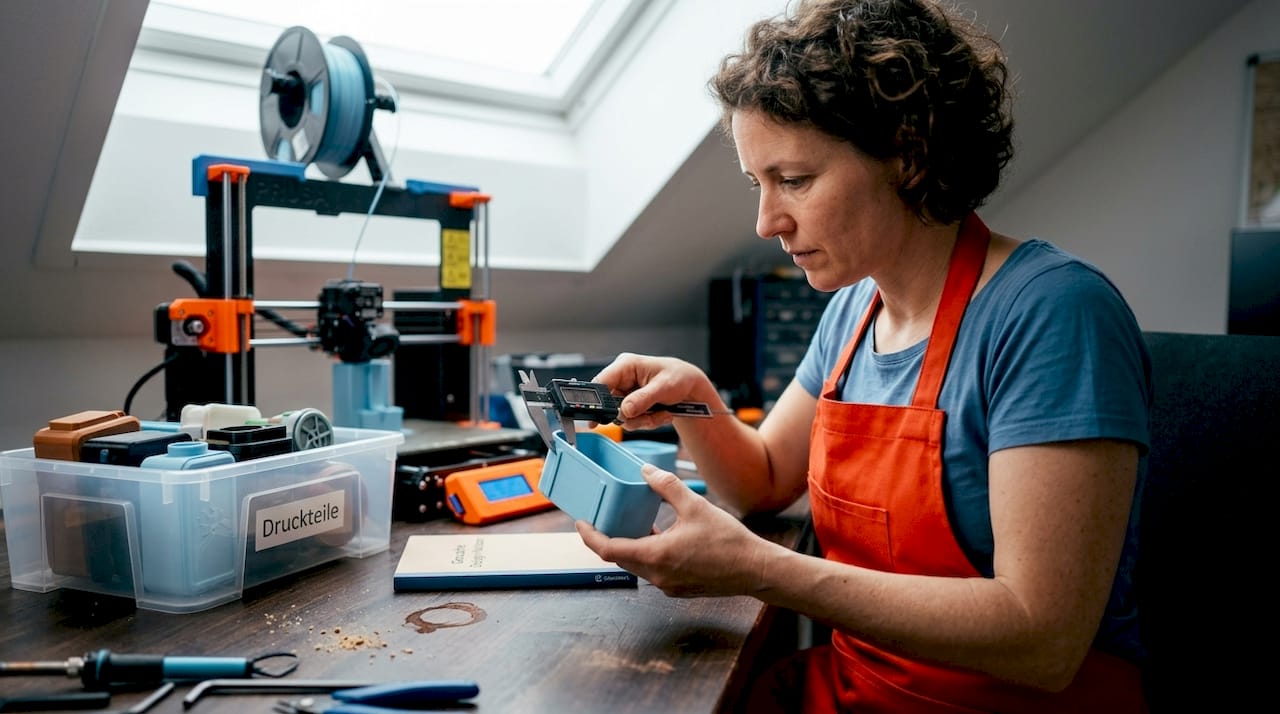
What You Need for 3D Printing Your Geocache
Before you start, you'll need the right equipment. Being well-prepared saves time and avoids costly mistakes.
Materials at a Glance
| Material | Advantages | Disadvantages | Recommendation for Geocaching |
|---|---|---|---|
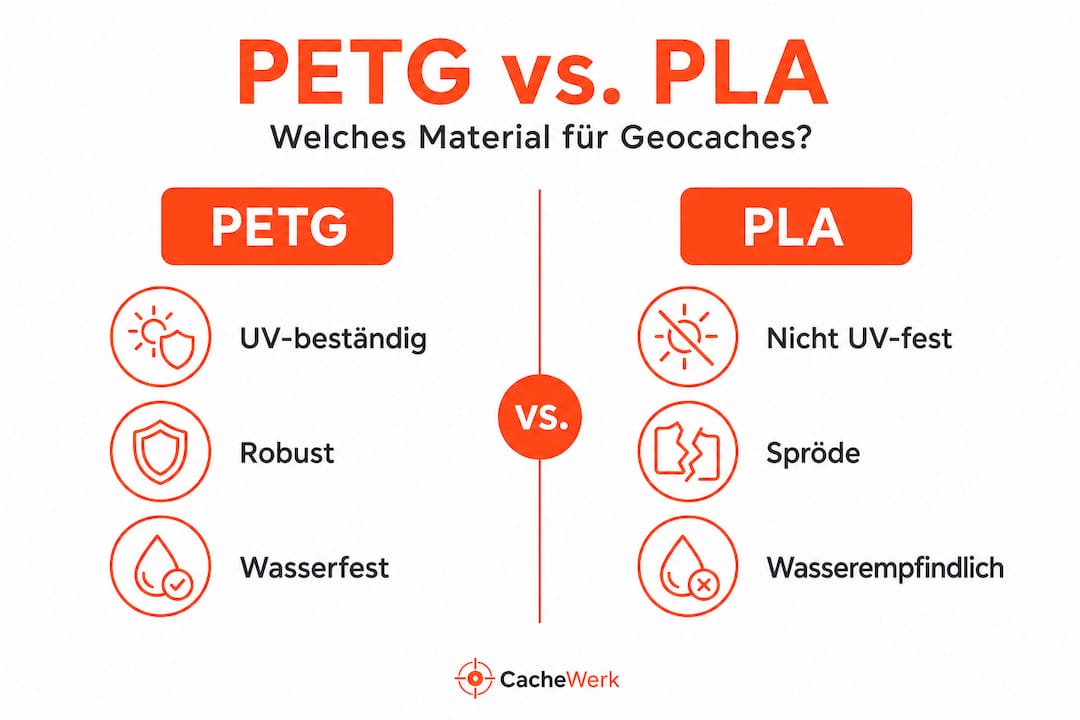
| PETG | Weather-resistant, flexible, UV-stable | Slightly more difficult to print | First choice for outdoor |
| PLA | Easy to print, inexpensive | Not UV-stable, brittle in cold | Only for indoor caches |
| ASA | Very UV-resistant | Expensive, requires enclosure | For extreme locations |
PETG (Polyethylene terephthalate glycol) is the material of choice for geocaches. It tolerates rain, frost, and direct sunlight significantly better than PLA. Furthermore, it is slightly bendable, which helps with drops or external pressure.
You will need the following tools and aids:
- FDM 3D printer with a heated print bed
- Slicing software (e.g., PrusaSlicer, Cura, or Bambu Studio)
- PETG filament in a suitable color (brown, grey, green for camouflage)
- Silicone or epoxy resin for sealing
- Sandpaper (120 and 240 grit) for post-processing
- Brush and acrylic paints for additional camouflage
The geocaching print parameters recommend a layer height of 0.2 mm for PETG, at least 30% infill (100% for small parts), and a wall thickness of at least 2 mm with 4 to 5 perimeters.
Pro tip: Always print a small test block with your settings before starting the actual model. This saves filament and time.
Safety note: 3D printers generate heat and fumes during operation. Always operate your printer in well-ventilated areas and never leave it unattended.
With this overview, you are optimally prepared. Let's start planning your individual hide.
From Idea to STL File: How to Plan Your Geocache
After you have everything ready, it's time for the digital design. This step significantly determines the quality and longevity of your cache.
Step-by-step from Design to STL File
- Sketch: Draw your idea on paper. Note dimensions, locking mechanism, and planned camouflage shape.
- Choose modeling software: For beginners, Tinkercad (free, browser-based) or Fusion 360 are suitable. Advanced users can use Blender for organic shapes.
- Consider geocaching rules in the design: This is crucial.
- Export STL and load into slicer.
- Test print a small part (e.g., only the lid) before the main print.
Important: According to geocaching guidelines, a cache must be clearly identifiable as a geocache, must not use dangerous mimicry, must be waterproof, must contain a logbook of at least 5 x 5 cm, must include the owner's contact information, and must not be permanently affixed to the environment.
These rules sound simple, but they are often neglected. A cache that looks like an object that could frighten uninvolved people (e.g., a deceptively real grenade) will not be approved by the geocaching platform and can even lead to problems with authorities.
Cleverly Integrating Camouflage into the Design
Choose shapes that naturally fit into the environment. Popular ideas include:
- Tree stump or tree bark: Fits into forest areas, very effective
- Stone or rock: For rocky terrain or city parks
- Mushroom or cone: Creative and inconspicuous
- Screw or bolt: Classic for urban environments
Pro tip: Look at already published geocache models on platforms like Thingiverse or Printables. They will give you inspiration and show which shapes are popular in the community. Combine existing ideas with your own touch.
You can find more inspiration for creative geocaching hides in our blog.
Print Settings and Pro Optimization for Robust Geocaches
Only the right material choice and exact print parameters guarantee truly durable geocache containers.
Optimal Print Parameters for PETG
The proven print settings for PETG at a glance:
- Layer height: 0.2 mm for a good balance of strength and print time
- Infill: At least 30%, 100% for small or mechanically stressed parts
- Wall thickness: At least 2 mm, preferably 4 to 5 perimeters
- Top and bottom layers: At least 5 layers
- Print speed: 40 to 50 mm/s
- Hotend temperature: 235 to 245 °C
- Bed temperature: 70 to 80 °C
- Fan: 30 to 50% cooling
PETG vs. PLA for Geocaching
| Property | PETG | PLA |
|---|---|---|
| UV Resistance | Good | Poor |
| Water Resistance | Very Good | Moderate |
| Flexibility | Medium | Brittle |
| Printability | Medium | Easy |
| Price | Medium | Inexpensive |
| Outdoor Recommendation | Yes | No |
Typical problem areas and their solutions:
Threads often don't hold properly because the tolerances are printed too tightly. The solution: Add 0.1 mm tolerance to the model, i.e., model the threads in the lid slightly larger than on the container.
Warping on larger prints can be prevented by a heated bed at 75 to 80 °C and a slow first layer. A brim (wide edge) around the model also helps.
Pro tip: For very wet locations, e.g., directly by streams or in bogs, printing alone is not enough. Seal the inside of the container with silicone or epoxy resin. This significantly extends the lifespan.
We have summarized all printing experiences for geocaching in detail on our blog.
Camouflage and Customization: More Than Just Appearance
The technique is solid. But the right camouflage determines how long your cache will last in practice.
Natural camouflage always beats flashy designs. Caches with natural mimicry survive longer, are less often discovered by Muggles (non-geocachers), and are less likely to be archived.
Practical Camouflage Methods
- Texturing in the slicer or with a tool: Tools like BumpMesh enable realistic surfaces directly on the model. Bark, stone, or moss can be simulated deceptively realistically.
- Paint and coloring: Print in a base color and then paint the cache with acrylic paints. Multi-layered painting looks more natural.
- Multi-color printing: Modern printers with multi-color systems allow for colored details without post-processing. However, printing complexity increases significantly.
- Utilize material surface: PETG has a slightly glossy surface. Mattify it with fine sandpaper or matte varnish for a more natural look.
Practical tip: Test your finished cache outdoors under real conditions for at least a week before placing it. Rain, temperature fluctuations, and direct sun will quickly show whether the seal and camouflage really work. Failures lead to wet logs, frustrated finders, and ultimately to the cache being archived.
Pro tip: Photograph your cache at its planned hiding spot before you place it. Look at the photo from two meters away. Does the cache immediately catch your eye? Then you need more camouflage. You can find more ideas for camouflage in our blog.
Learning from Mistakes: Typical Problems and Their Solutions
After refining your camouflage, practical experience and troubleshooting play a crucial role in creating durable caches.
The Most Common Mistakes and Their Solutions
-
Leaks: The most common error. Solution: Print more perimeters, increase infill, reduce print speed. Then seal with silicone or epoxy resin.
-
Warping during printing: Large, flat parts lift off the bed. Solution: Increase bed temperature to 75 to 80 °C, print the first layer slowly, use a brim.
-
Threads don't work: Lid won't close or jams. Solution: Add 0.1 mm tolerance in the model and test print the thread before the main print.
-
Lack of camouflage: Cache immediately stands out. Solution: Add texture, adjust color, rethink shape. Study natural examples from the surroundings closely.
-
Weak closure: Lid opens due to frost or pressure. Solution: Integrate an O-ring groove into the design, increase wall thickness, test the closure mechanism.
Pro tip: Print critical individual parts (lid, threads, closure) separately as a test print. This way, you identify problems early without having to re-print the entire model. Afterwards, test the finished cache under real outdoor conditions.
What Really Matters in 3D Printing Geocaches: Our Experience
After looking at typical mistakes, we want to share our practical experience on what truly makes a difference.
The issue of watertightness is massively underestimated. Many cachers print a beautiful container, place it, and then wonder about wet logs after the first rain. The truth is: no FDM print is truly waterproof without post-processing. The layers have microscopic gaps. Anyone who ignores this will be annoyed, as will their finders.
Our clear advice: use PETG, print with at least 4 perimeters, and then seal it. Done. Exotic materials like TPU or nylon sound exciting, but rarely offer real advantages in everyday geocaching. Proven PETG with proper post-treatment easily lasts several years outdoors for us.
Another point almost no one considers: maintenance and control. A cache is not a one-time thing. Plan regular visits, check for watertightness and camouflage, and replace the logbook in time. Caches that are maintained remain active and bring joy.
Regarding camouflage, we have a clear opinion: anything that looks too artificial or too perfect stands out. Real tree bark has irregularities. Real stone has spots and moss. Don't just print a smooth model and call it "stone." Add textures, paint it in multiple layers, and test it on site.
However, the biggest success factor is communication with the community. Experience reports from other cachers show what works in which region. Read long-term experiences with geocache printing, exchange ideas in forums, and learn from the mistakes of others. This saves time, filament, and frustration.
And one honest note: If you only want to hide one or two caches, the effort with your own printer, software, and learning curve often isn't worth it. In this case, it makes much more sense to buy ready-made, professionally printed solutions. The quality is immediately available, the camouflage is tried and tested, and you save many hours of getting started.
Want More? Discover Professional 3D Geocaches and Accessories
To conclude, you have everything you need for your own projects. Or you can use professional solutions that are already proven many times over.
If you only want to hide a few caches or simply want to get started immediately, you'll find finished, high-quality 3D-printed PETG hides at CacheWerk.de. Perfectly camouflaged, weather-resistant, and ready for immediate use. A highlight, for example, is the Tree Mushroom Geocache Hide, which looks deceptively real and blends ideally into forest areas. For accessories, logbooks, camouflage materials, and other items, it's worth taking a look at the Geocaching Equipment and Accessories. Get inspired and combine DIY projects with ready-made professional solutions for the best results.
Frequently Asked Questions About 3D Printing Geocaches
Which material is best for outdoor geocaches?
PETG is the first choice for outdoor caches due to its weather resistance, UV stability, and robustness. Recommended print parameters include 0.2 mm layer height, at least 30% infill, and at least 2 mm wall thickness.
How can I make my 3D printed geocache waterproof?
Print with more perimeters and higher infill, reduce print speed, and then seal with silicone or epoxy resin for reliable waterproofing.
Do I need to consider special geocaching rules when designing?
Yes. The cache must be clearly identifiable as a geocache, waterproof, secure, and large enough for a logbook. According to geocaching guidelines, dangerous camouflaging is prohibited, and the cache must not be permanently affixed to its surroundings.
How do I prevent warping when printing larger caches?
A heated print bed at 75 to 80 °C and a slow first layer are the most effective measures against warping in larger models.
What camouflage methods have proven particularly effective for 3D printed geocaches?
Natural structures, realistic textures, and subtle colors work best. Natural mimicry significantly outperforms conspicuous designs in terms of durability and inconspicuousness.