
Hiding a City Cache: Instructions for the Perfect Urban Cache
Here's how to hide a city cache safely and muggle-free: First, gain experience, read the official guidelines, choose an inconspicuous location with appropriate camouflage, measure your coordinates multiple times, and have a test finder check the cache before publishing. This guide on hiding a city cache will walk you through the process step-by-step, ensuring your listing doesn't get stuck with the reviewer.
Here's a quick checklist for those in a hurry; each point will be covered in its own section later:
- Experience: Gather at least a few personal finds before hiding your own.
- Rules: Read official guidelines and local specifics.
- Location: Muggle-proof, accessible, with a small story or view.
- Container: Weatherproof, appropriately sized, city-friendly (small and robust beats large and conspicuous).
- Camouflage: No screws in trees, no property damage, inconspicuous in the cityscape.
- Coordinates: Measured multiple times, averaged, checked in the correct format.
- Beta test: Plan for a test finder before publishing.
- Listing: Complete, with a precise hint and contact information.
- Maintenance: Regular check-up rhythms and quick responses to logs.
Pro Tip: If you're unsure if a spot is suitable, ask yourself: "Would a muggle accidentally look directly at it here?" If the answer is yes, keep looking until it's no.
Key Takeaways
A city cache will only last long and bring joy to finders if its location, camouflage, coordinates, and maintenance are all equally well-thought-out.
| Topic | Details |
|---|---|
| Gain experience | Become active as a finder first before you hide and publish a cache yourself. |
| Read guidelines first | Check official rules on distances, accessibility, and permissions before choosing a location. |
| Precise hint is key | An accurate hint prevents widespread searching and protects both the cache and its surroundings. |
| Never skip beta testing | An impartial test finder identifies errors in coordinates and hints before publication. |
| Use pre-made camouflage hides | Products like CacheWerk's Fake Water Shield save crafting time for an inconspicuous urban hide. |
Table of Contents
- Preparing to Hide a City Cache: Experience, Guidelines, and Permissions
- Which Cache Type and Container Suits the City?
- How Do You Find the Right Location for Your City Cache?
- How to Camouflage and Secure Your Cache Without Damage
- Measuring Coordinates Correctly and Conducting the Beta Test
- What Belongs in the Listing and How Does Communication with the Reviewer Work?
- How Do You Maintain a City Cache Permanently?
- What Legal and Environmental Protection Aspects Must You Consider?
- Practical Hiding Ideas for the Urban Cache
- What Owners Learn from Their First City Caches
- Suitable Camouflage Hides for Your Next City Cache
- Sources
Preparing to Hide a City Cache: Experience, Guidelines, and Permissions
Before you even think about location or container, you need practical experience as a finder. The community recommends gathering at least about 20 personal finds before hiding a cache yourself. That might sound like an arbitrary number, but it's not: Someone who has opened enough caches themselves knows how a poorly made hide feels (frustrating) and how a good one feels (surprisingly simple).
The official process for your first cache follows a clear sequence: read the guidelines, choose a location, select a suitable container, measure coordinates, write the listing, and communicate with the reviewer. Following this order will save you inquiries and rejections later on.
Important points from the guidelines that many novices overlook:
- Maintain minimum distances to other caches (the exact distance varies by region and is specified in the listing form).
- The cache must be accessible without tools or digging; burying it is not allowed.
- Owner's contact information belongs in the logbook or listing.
- Public areas are usually uncomplicated, but private property or specially protected areas require prior permission from the owner or the relevant authority.
If you're unsure whether a property is public or private, it's worth a quick look at the cadastre or an inquiry on site. That takes five minutes and saves you from a later archiving by the reviewer, who checks precisely these questions before a listing goes live.
Pro Tip: While searching for a location, make a note of why you believe a place is publicly accessible. The reviewer often asks this exact question, and a prepared answer significantly speeds up approval.
Which Cache Type and Container Suits the City?
In densely built-up areas, the classic Traditional cache almost always wins. A Multi-Cache with multiple stages can also work in the city but requires significantly more maintenance effort because each stage must be muggle-proof individually. Mystery Caches are well-suited if you have an interesting puzzle idea, but a solid Traditional cache is perfectly sufficient as a starting point.
For size in the city: Smaller is almost always better. A micro is hardly noticeable, a small already needs a clever hiding spot, and regular sizes only work in cities in truly secluded corners.
| Size | Typical Use in the City |
|---|---|
| Micro | Lamppost, fence post, handrail, traffic sign |
| Small | Wall niche, tree root in a park, under a bench |
| Medium/Regular | Forest edge on the outskirts, less frequented green space |
Certain types of containers have proven effective for urban hides: PETlings, small film canisters, magnetic containers, and robust Lock&Lock boxes. Waterproofness is not a nice-to-have but a must, as a soaked logbook makes the entire cache unusable. The Geocaching community consistently recommends waterproof containers with a logbook, pen, and contact info as minimum equipment, with attachments not permitted to damage the environment. More on robust container solutions can also be found in our comparison of outdoor cache boxes.
What belongs inside: logbook, a working pen or pencil, a note with the owner's contact info. Trade items are not possible with small containers anyway, and for larger caches: nothing valuable, nothing fragile, nothing that someone might be upset about if it goes missing.
Pro Tip: A PETling in camouflage color beats almost any improvised solution. It's small enough for most city hides and tight enough to withstand rain and condensation.
How Do You Find the Right Location for Your City Cache?
A good urban location meets four criteria simultaneously: It's hardly visible to muggles, but accessible to geocachers with a little patience, at a spot with sufficient but not too much foot traffic, and ideally has a small connection to the surroundings. A cache next to a historic building or with a view of a landmark brings more joy than an interchangeable corner without any context.
This is precisely where the so-called Morsix Rules come into play, an informal but widely accepted quality standard in the community. It clearly advises against placing caches in unattractive places like guardrails or standard rest areas and instead recommends locations with historical or scenic value. Experienced owners aptly describe the goal: a good city cache should blend inconspicuously into the cityscape so that seekers can retrieve it without attracting attention.
What you should avoid:
- Locations directly in front of apartment windows, where residents can observe every movement.
- Traffic hubs with a high risk of accidents or without a safe place to search.
- Known fear spots or dirty corners that make the find unpleasant.
- Highly visible rows of benches at lunchtime when dozens of passersby are sitting there.
Proven urban ideas include a magnetic container under a handrail, a holder on a post, or a small niche at the edge of a monument. These places work because they appear commonplace. Nobody questions a post or a railing.
Also consider the annual cycle. A hide that is perfectly concealed by foliage in summer can suddenly be exposed in winter. Therefore, choose locations that work regardless of the season, or plan a seasonal maintenance note.
Pro Tip: Visit your desired location at different times of day before committing. A place that appears empty at 10 AM might be full of commuters at 5 PM.
How to Camouflage and Secure Your Cache Without Damage
Camouflage is what determines success or failure in the city, even more so than the choice of location itself. Proceed systematically:
- Choose material: Magnets for metal surfaces, Velcro for rough surfaces, weatherproof cable ties for posts and railings.
- Match color: The container should match the color of its surroundings – gray for concrete, brown for wood, black for metal constructions.
- Test attachment: On site, check if the construction can withstand wind, rain, and occasional bumps.
- Simulate access: As a stranger, practice retrieving it and note how long your hand movement remains visible.
A few rules are non-negotiable. No screws or nails in living trees; this permanently damages the tree and violates applicable environmental protection principles. No attachment to traffic signs or infrastructure that could be damaged or impaired in its function. And no constructions that could fall down even with strong winds or vibrations.
The underlying principle can be summarized simply: the more inconspicuous the attachment, the longer the cache survives. A passerby standing nearby should notice nothing unusual. Therefore, the motto in the city is "Keep it simple"; complicated mechanics with moving parts often break or attract attention in an urban environment.
A precise hint primarily helps against vandalism and accidental discovery. Without it, finders will search widely, creating exactly the attention you want to avoid. A precise hint noticeably reduces search time and protects both the cache and the surroundings from unnecessary rummaging.
Pro Tip: Build the camouflage so that you can retrieve the cache with a single, natural hand movement. Two hands and ten seconds of fumbling immediately look suspicious to bystanders.
Measuring Coordinates Correctly and Conducting the Beta Test
Precise coordinates are the foundation of any functioning listing, and this is where most beginner mistakes happen. Here's how to proceed:
- Measure multiple times: Take coordinates from at least three different attempts, ideally at different times of day.
- Approach from different directions: GPS receivers vary depending on the approach angle, so walk to the hide once from the north and once from the south.
- Average the values: Average the collected values instead of relying on a single measurement.
- Check format: Ensure that the coordinates are in WGS84 format, the standard format for geocaching listings.
- Calibrate device: Use an up-to-date smartphone or GPS device and, if possible, cross-check with a second device.
After measuring, comes the beta test, a step that many skip and later regret. Ask someone who doesn't yet know the cache to find it using your coordinates and hint. Brief them briefly, but don't reveal too much, otherwise you won't be testing anything. Typical errors discovered include: an incorrectly transcribed digit in the coordinates, a hide that can only be found with prior knowledge, or a hint that confuses more than it helps.
Before submission, a final quick checklist is worthwhile: Is the cache actually hidden at the location? Are the logbook and pen dry in the container? Have the coordinates been double-checked? Did the beta test go smoothly without major issues? Only when all four points are answered with "yes" should the listing be published.
Pro Tip: Activate the highest GPS accuracy setting on your geocaching app and wait at least 30 seconds after opening the app before reading the coordinates. The first values after startup are often inaccurate.
What Belongs in the Listing and How Does Communication with the Reviewer Work?
A complete listing requires certain mandatory information: cache name, cache type, container size, Difficulty and Terrain rating, appropriate attributes, and a well-thought-out hint. The more precise this information, the smoother the review process.
Particularly important for muggle-proof safety are:
- An exact, but not too obvious, hint for the hiding spot.
- Notes on access times, if the location is closed or crowded at certain times of day.
- Parking instructions, if arrival by car is relevant.
- Complete, up-to-date owner contact information for inquiries.
Useful attributes for a typical city cache include "wheelchair accessible," "not recommended at night," "public transportation nearby," or "parking available." These small details save finders time and show the reviewer that you have thoughtfully considered the location.
Communication with the reviewer is usually straightforward, provided the basics are in order. After submission, the reviewer checks distances, accessibility, and completeness of the information. If there are questions, it's best to respond concisely and factually, with concrete evidence, such as a screenshot of the location or a brief explanation of accessibility. Revision requests are normal and no cause for concern; they are part of the official review process and ultimately ensure the quality of the entire cache network. A practical foundation for planning can also be found in our checklist for geocache hides.
Pro Tip: Formulate the hint so that it seems cryptic on first reading, but makes immediate sense on second reading after searching. This "aha!" moment is what makes a good city cache.
How Do You Maintain a City Cache Permanently?
Hiding a cache is the easy part; the maintenance afterwards determines its lifespan. Incorporate maintenance checks into your daily routine, for example, during your dog walk or on your way to work, instead of planning extra trips for it.
Typical problems and how to react:
- Full logbook: Replace it regularly before finders run out of space to sign.
- Broken container: Keep a spare container on hand so you don't have to order one only after a log reports "damaged."
- Muggle removal: Relocate the cache or rethink the location if this happens repeatedly.
- Vandalism: In case of destruction, honestly check if the location is fundamentally too exposed.
You should prioritize logs marked "Needs Maintenance," not just after weeks. A quickly responding owner enjoys a much better reputation in the community, and reviewers certainly pay attention to how well-maintained an owner's existing caches are for future listings.
For emergencies, a small owner's emergency kit is worthwhile: a spare logbook, a few spare pens, cable ties, a suitable spare container, and a moisture-repellent cloth. This usually allows on-site repairs to be completed in just a few minutes.
Pro Tip: Schedule fixed maintenance dates in your calendar, for example, every six to eight weeks. A regular rhythm prevents a cache from decaying unnoticed for months.
What do you need to consider legally and regarding environmental protection?
Public spaces such as parks, sidewalks, or squares are generally unproblematic as long as you don't cause any damage. For private properties, nature reserves, or particularly sensitive areas, you need prior permission from the owner or the responsible authority. Always check this before determining a location, not only when the reviewer asks.
Environmental protection is not a secondary issue for urban caches. Don't bury anything, don't damage plants, don't alter furniture like benches or fences. A respectfully chosen location pays off twice: it lasts longer and protects the environment, which others also use.
For finders, it's important to think about safety. No dangerous climbing, no locations that could endanger children, and where possible, accessibility for people with mobility impairments. A cache that only extreme climbers can reach might sound appealing, but it excludes a large part of the community.
A fundamental legal question cannot be answered generally; liability and permit issues depend heavily on the individual case. Read the official Geocaching guidelines and, if in doubt, contact the relevant local authority instead of relying on assumptions.
Pro Tip: Photograph the chosen location before hiding. If questions about its condition or accessibility arise later, you'll have proof ready.
Practical hiding ideas for urban caches
A few proven ideas that always work in cities:
- Magnetic film canister on a handrail: Hardly visible under a metal stair railing, easy to remove.
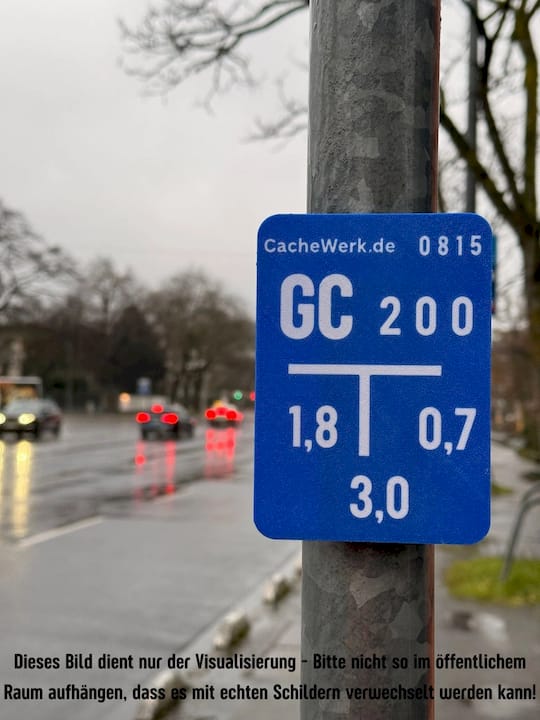
- Camouflaged traffic sign with post holder: Looks like part of the signage, hardly noticeable even up close.
- Niche in a mailbox cluster: Works well in residential areas with multiple house numbers, as long as no apartment window looks directly onto it.
- PETling in a wall joint: Ideal on old city walls or bridge pillars with visible joints.
- Fake screw or bolt on metal fences: Small, magnetic, intended for experienced seekers.
When choosing the right hiding spot, the main thing is how well the camouflage blends into the existing infrastructure. A camouflaged sign with a sturdy post holder, for example, can be attached to fences, bollards, or barriers without anyone taking a second look.
A geocacher who had placed such a camouflage sign on a bollard in the city center later described in the log that he had walked past it three times before realizing that this very sign was the hiding spot. Exactly this effect makes a good urban hiding spot.
For those looking for a weather-resistant, inconspicuous hiding spot without much DIY effort, CacheWerk offers ready-made solutions like the Fake Water Shield as a camouflage hide with a post holder, which blend directly into the cityscape. This recommendation is not a competitive comparison table but a practical option for those who don't want to solder, cut, and paint themselves.
Pro Tip: Combine an inconspicuous camouflage product with a self-chosen, unusual location. The mix of good material and clever placement is usually stronger than any elaborate individual solution.
What owners learn from their first urban caches
Anyone hiding their first urban cache almost always underestimates two things: how much time the location search actually takes, and how often you have to revise your own hint until it really fits. The first draft of a hint is almost never the final one. Usually, it becomes more precise after the beta test because the test finder took longer at one point than planned.
Three lessons run through many owner experiences. First: A hint that is too vague causes more nerves than one that is too precise. Finders who search for a long time are more likely to leave complaint logs than those who find it quickly. Second: Maintenance is not an exception, but the rule. Anyone who believes a cache runs on its own will be surprised at the latest after the first vandalism log. Third: A beta test with the wrong person brings little. An experienced geocacher finds almost everything, while a novice will show you the real weaknesses in the listing.
Precisely on the third point, a detail that is rarely mentioned is worthwhile: Brief your test finder as an uninvolved finder would experience the cache later, without additional knowledge, without prior tips about the approximate area. Only then will the test actually show whether the hint and coordinates work on their own.
Pro Tip: Explicitly ask your test finder for honest criticism, even if it's unpleasant. A beta test where everything runs smoothly is often not a good sign, but an indication that the test was not critical enough.
Suitable camouflage hides for your next urban cache
Those who want to solder, saw, and paint themselves will find enough material in this guide. Those who prefer to use a ready-made, urban hideout immediately save themselves the crafting time with CacheWerk's prefabricated solutions, which otherwise lies between the location idea and the finished cache.
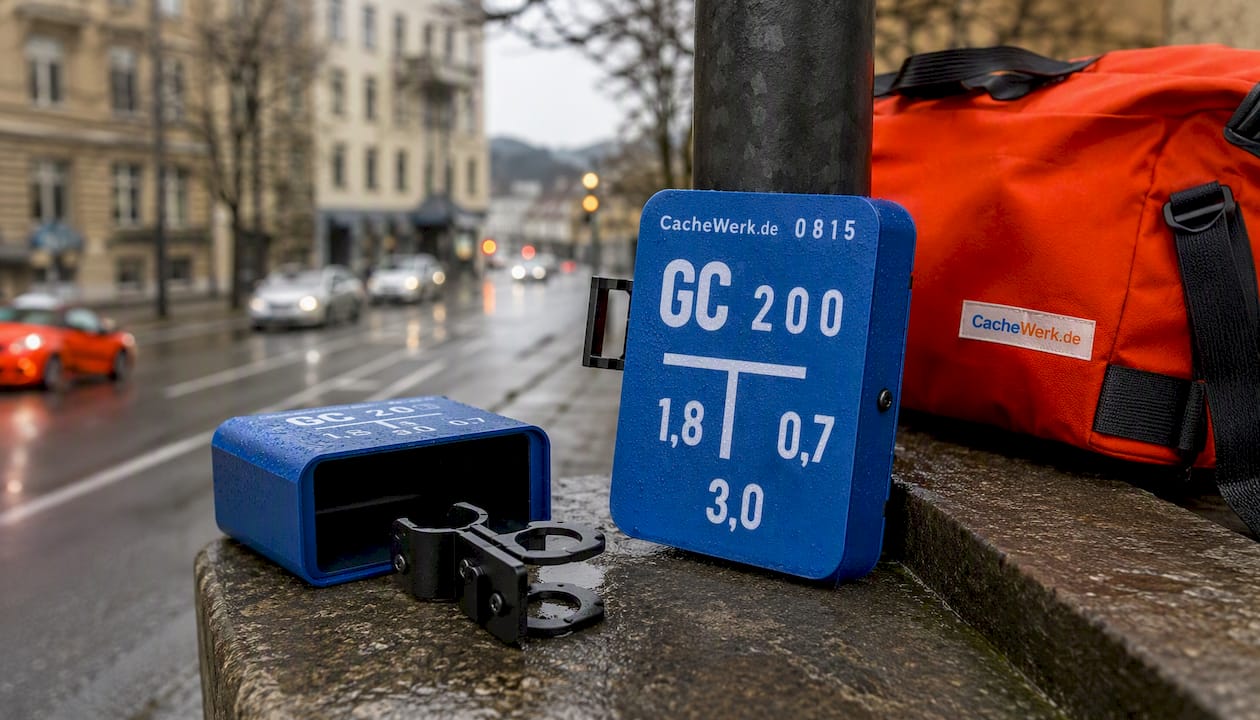
The Fake Water Shield as an urban camouflage hide with a post holder blends directly into the cityscape and can be attached to fences or bollards without damage. For those who want it even more individual, the customizable Fake Water Shield offers a variant according to your own design.
Why these solutions are suitable for urban caches:
- Inconspicuous in the cityscape, hardly distinguishable from real signage.
- Weatherproof construction to keep the logbook and contents dry.
- With a post holder for flexible mounting without drilling or screwing into trees.
- Customizable if you want your own design for your cache.
Take a look at both variants and choose the size that fits your planned location before you start searching for a spot.
Sources
- Geocaching Guidelines
- Setting & Hiding Caches: Tips & Help for Beginners – Geocaching Magazin
- Geocaching-info