Concealed screw installation: Safely hidden in 5 steps

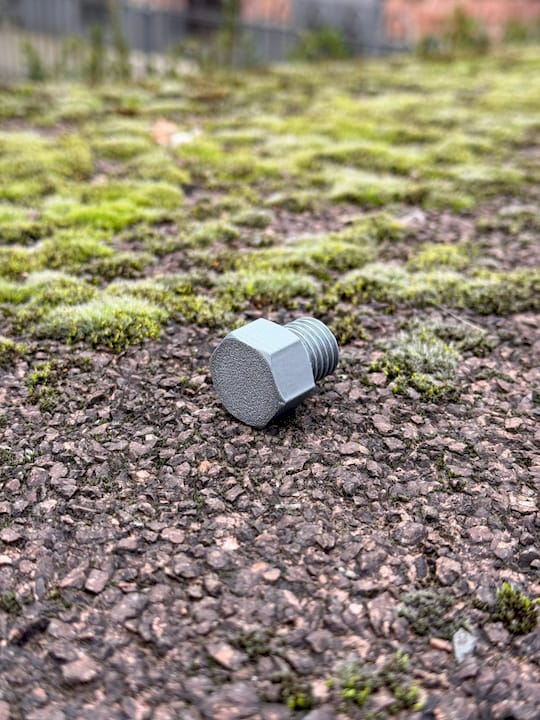
You install a camouflage screw by inserting a waterproof screw stash with an O-ring, securing it firmly to the surface (recessed magnet or screwed mount), checking the logbook, and matching the opening's color to the surroundings. Passing a water bath test, conducting a genuine adhesion check, and adhering to the Geocaching guidelines are essential. Ready-made solutions with screw stashes save you a lot of crafting work.
In short:
- A waterproof camouflage screw with an O-ring, magnetic attachment, and appropriate coloring is necessary to withstand weather conditions in the field long-term.
- PETG is the most reliable plastic for 3D-printed geocache housings, while stainless steel or rust-protected steel are suitable for metal parts.
- Water bath and adhesion tests are essential to ensure tightness before placement, with regular checks recommended after 1 to 3 months and then every six months.
- Compliance with Geocaching guidelines requires that no damage is caused to the environment, infrastructure, or property, and that the attachment method is explained transparently in the listing.
- Ready-made mounting sets from suppliers like CacheWerk save on crafting effort and offer proven solutions for various application scenarios.
Table of Contents
- Which materials and parts are suitable for camouflage screws?
- Step by step: Successfully installing a camouflage screw
- How to test camouflage screws before placement?
- What Geocaching rules apply to hidden attachments?
- Author's perspective: What really holds up in practice
- Ready-made camouflage screws and accessories from CacheWerk
- Sources
- FAQ
Which materials and parts are suitable for camouflage screws?
The choice of material determines whether your camouflage screw fails after three weeks in the mud or lasts for three years without issue. PETG has established itself as the most reliable plastic for 3D-printed screw housings because it handles UV radiation and moisture significantly better than PLA. While PLA is easier to print, it becomes brittle when exposed to sunlight and loses its shape. For a cache that stays in a dry, shady spot for only a few weeks, PLA is sufficient. For everything else, PETG is the better choice, especially since 3D-print templates for screw-caches usually already include an integrated thread that facilitates a waterproof seal.
For metal parts, the rule is: prefer stainless steel or consistently provide untreated steel with rust protection; otherwise, corrosion will eat through the mount within one winter.
Three proven options are available for sealing:
- O-ring: the most common solution, inexpensive and easily replaceable if it becomes brittle.
- Silicone sealant: good for irregular gaps, but harder to replace without leaving residue.
- Clamping ring: mechanically stable, particularly suitable for screw caps with an eyelet.
Regarding magnetic attachment, practice shows a clear picture: recessed magnets last significantly longer than externally glued ones because the adhesive point inside the housing is protected from moisture and mechanical stress, as confirmed by reports from geocaching forums. If you want to save yourself the crafting, opt for a ready-made screw stash with an integrated secret compartment and magnet, or a screw cap with an eyelet for hanging PETling stashes.
Step by step: Successfully installing a camouflage screw
The installation of a camouflage screw takes place in five distinct phases. Those who follow this order avoid common beginner mistakes.
- Preparation: Choose the location based on accessibility and safety, not just appearance. Have a drill, sealant, appropriate screwdriver, and a simple magnet test ready. Measure the coordinates precisely with a GPS device or smartphone and consider whether a reviewer check before placement is advisable.
- Choosing the attachment: Either set the screw into an existing mount (such as an existing threaded hole on a fence or post), use a recessed magnet in the housing for metal surfaces, or glue the stash on smooth surfaces with weatherproof adhesive. In the magnet variant, every millimeter of recession counts: the deeper the magnet sits in the housing, the less moisture reaches the adhesive point.
- Sealing and logbook: Roll the logbook tightly, insert it dry, and place the O-ring cleanly in its groove before screwing the cap on. A misaligned O-ring is the most common cause of later moisture damage.
- Applying camouflage: Match the color tone and surface texture to the surroundings, for example with weatherproof paint or natural material. Avoid any disguises that could be mistaken for actual infrastructure or endanger others, such as replicas of warning signs.
- Final check: Check visibility from multiple angles, test magnetic hold with a light pull, check the logbook for dryness, and take photos for your listing and as a reminder for the next maintenance.
Pro tip: Take photos of the installation immediately after sealing, not weeks later. This gives you a reference point to see immediately during the next maintenance if the seal or magnet has shifted.
For the final camouflage, it is worth looking at the guide to DIY geocache camouflage, especially when working on trees or wooden structures.
How to test camouflage screws before placement?
A stash that appears tight in the living room may fail in the rain. Therefore, the water bath test is mandatory: place the housing in water for about 24 hours and then check if the logbook has remained dry. This practice has become standard in the community because small manufacturing defects in the thread or on the O-ring only become visible under real pressure.
Additionally, an adhesion test is worthwhile: a pull test on the magnet, combined with one or two simulated temperature changes between frost and heat, shows whether the magnetic force is still sufficient after weeks outdoors.
For maintenance, a simple rule of thumb applies:
- First check after 1 to 3 months to detect initial faults early.
- After that, a six-month inspection for normally exposed locations.
- More frequent checks for places with direct sun, standing water, or heavy pedestrian traffic.
- Typical repairs: replace O-ring, swap magnet, remove rust on metal parts, document each in the listing.
The tutorial on weather-resistant cache stashes also addresses typical weak points in long-term stashes.
What Geocaching rules apply to hidden attachments?
Official Geocaching guidelines require minimum distances to other caches, genuine accessibility for searchers, and consideration for the environment and local laws. This applies to camouflage screws just as much as to any other stash.
- No permanent damage to trees, fences, buildings, or public property, no matter how inconspicuous the screw appears.
- If uncertain about the location, ask the reviewer or property owner in advance.
- Make it transparent in the listing how the attachment works, how often you perform maintenance, and how one can reach you in case of problems.
- If legal doubts exist, for example with public infrastructure, clarification belongs to local regulations or reviewers, not a gut decision on-site.
For tree-near installations, the guide on tree-friendly attachment offers additional orientation.
Author's perspective: What really holds up in practice
In tests, one combination has proven to be the most reliable time and again: PETG housing, a recessed magnet, and a cleanly set O-ring. Adhesive solutions alone seem simpler at first glance but fail precisely when frost and moisture occur together. Many owners underestimate how much a slightly misaligned O-ring nullifies the entire sealing effect, even if the housing and magnet are perfectly positioned. Community feedback from forums and the CacheWerk blog shows the same mistake repeatedly: too little time for the final check. Anyone who consistently performs the water bath test once saves themselves several repair trips later.
— Benedikt
Ready-made camouflage screws and accessories from CacheWerk
You don't have to design your own screw stash. There are field-tested solutions that already incorporate exactly the installation steps from this article, so you don't have to gather threads, seals, and magnets individually.
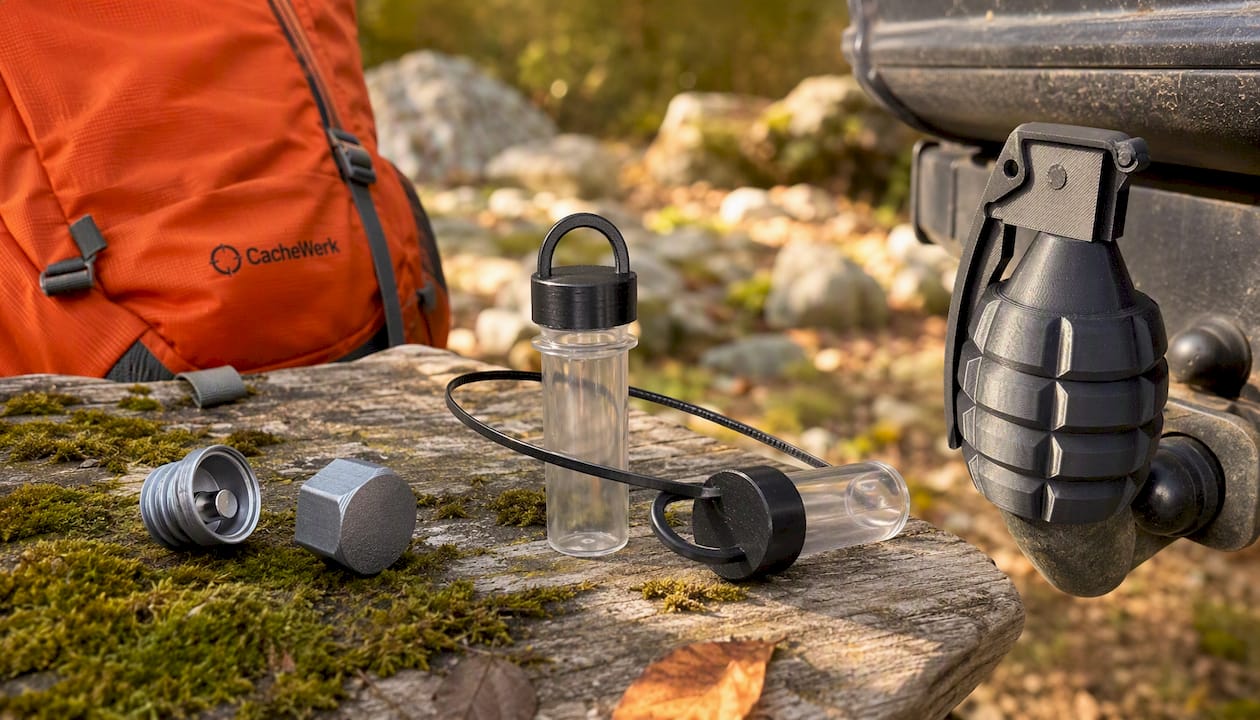
The geocaching stash with a secret compartment and magnet is suitable as a Nano-cache with an already integrated magnetic closure, ideal for metal fences, lampposts, or bollards. For hanging stashes on trees or grilles, the screw cap with an eyelet for PETlings is suitable, robust and weather-resistant in a two-pack. Those who want to camouflage an urban cache particularly inconspicuously can also work with the trailer hitch cover in a grenade design, a humorous car accessory that works as an eye-catcher in urban environments rather than a stash, deliberately diverting attention from the actual cache. For replacement seals, stronger magnets, or weatherproof adhesive, it's worth checking out the geocaching equipment, and those who want to print their own housings can find suitable 3D-print files directly in the shop. Take a look at the product pages and complement your next installation with the appropriate part from the range.
Sources
In-depth information is provided by the Geocaching guidelines, the discussion on magnet attachment, and 3D-print templates for screw-caches.
- A guide on how you can hide your first geocache – Official Blog
- What’s a good secure way to attach Neodymium magnets to a geocache? - Outdoors Stackexchange
- Geocaching 3D Print Templates - Blog 3D Druck Archiv
FAQ
How do I correctly install a camouflage screw?
You place a waterproof screw housing with an O-ring onto a suitable mount or secure it with a recessed magnet, check the logbook for dryness, and match the camouflage color to the surroundings. Passing a water bath test before placement is part of a secure installation.
Which material is best suited for camouflage screws?
PETG is the most robust choice for 3D-printed screw housings because it resists UV radiation and moisture better than PLA. Metal parts also work, but should be made of stainless steel or treated with rust protection.
How often should I check a camouflage screw after installation?
A first check after 1 to 3 months detects initial faults, after which a semi-annual inspection is usually sufficient. Highly exposed locations with lots of sun or standing water require more frequent checks.
Where can I get ready-made camouflage screws instead of building them myself?
CacheWerk offers two ready-to-use solutions with the screw stash with secret compartment and magnet, and the screw cap with eyelet. Current prices can be found directly on the respective product pages.
What rules must I observe when hiding a camouflage screw?
The Geocaching guidelines require minimum distances to other caches, genuine accessibility, and consideration for the environment and local laws. Permanent damage to trees or public property should be avoided as a matter of principle.