
Magnetic Cache: How to build it securely and weatherproof
Yes, a magnetic cache can be built securely and made weather-resistant with simple means. You don't need a workshop or prior crafting experience. The workflow involves three steps: First, you gather the container, neodymium magnet, and sealing material. Second, you attach the magnet and seal the casing. Third, you test the adhesive force and watertightness before placing the cache outdoors.
- Materials: Container (Nano, Micro, or PETling), neodymium disc magnet, adhesive, sealant
- Construction: Secure magnet, allow adhesive to cure, seal casing
- Test & Hide: Pull test on magnet, water test, then find a spot
A word on safety first: Neodymium magnets of a certain size can painfully pinch fingers and can interfere with sensitive electronics or pacemakers. Combine this with proper sealing, and the cache will withstand rain and frost for months.
Key Takeaways
A magnetic cache lasts if the magnet size, adhesive choice, sealing, and regular maintenance are right, not just if the adhesive force is sufficient.
| Topic | Details |
|---|---|
| Magnet selection by cache type | Nano needs small magnets, PETling benefits from two 10x5 mm disc magnets with approx. 4.8 kg pull force. |
| Adhesive instead of hot glue | Pattex Repair Extreme withstands temperature fluctuations better and extends the lifespan of the bond. |
| Check seal regularly | Check O-ring or silicone every few months to prevent moisture and icing. |
| Placement only with permission | Do not attach to private property, mailboxes, or traffic signs without consent. |
| Ready-made alternatives from Cachewerk | Screw hide, cap nut cache, and PETling with magnetic holder solve sealing and corrosion problems directly upon purchase. |
Table of Contents
- Materials and Tools for Your Magnetic Cache
- How to Build a Magnetic Cache Step-by-Step
- How to Make the Cache Watertight and Weather-Resistant
- Which Magnet Size Suits Your Cache Type?
- Where Can You Place Your Cache?
- Testing Before Hiding and Maintenance Afterward
- Ready-Made Products Instead of DIY: When Is It Worth It?
- What Beginners Often Underestimate in Magnet Construction
- Your Introduction to Magnetic Caches with Cachewerk
- Sources
Materials and Tools for Your Magnetic Cache
Before you start, you need a clear idea of which cache type suits your hide. A magnetic cache is essentially a small container with a firmly glued magnet that can be attached to metal surfaces like guardrails, lampposts, or cap nuts. The choice of container largely determines the size, log strip capacity, and placement location.
Container Types Compared:
- Nano: Tiny, usually around one centimeter in height and width. Perfect for urban micro-hides, but only room for a thin log strip.
- Micro: Slightly larger, often with a thread or O-ring, suitable for small logbooks and mini trade items.
- PETling: Converted film canister or similar plastic container, offers more interior space for a complete logbook and is well-suited for forest edge or park hides.
For magnets, neodymium has become the standard because it provides high adhesive force in a small design. For Nano and PETling caches, disc magnets with 8 to 12 millimeters in diameter and 3 to 5 millimeters in thickness are usually sufficient. A practical report recommends two neodymium disc magnets measuring 10 by 5 millimeters, which together achieve about 4.8 kilograms of pull force and thus hold reliably even on slightly angled metal surfaces.
Pro Tip: Never buy the largest possible magnet just because it's available. An oversized magnet makes the cache harder to open and unnecessarily increases the risk of injury when handling.
For sealing, use O-rings for metal containers or silicone for self-built PETG casings. Pattex Repair Extreme has proven effective as an adhesive because it tolerates temperature fluctuations much better than hot glue, which quickly softens in summer heat. Also, keep a small pair of tweezers handy, pointed round-nose pliers for securing the magnet, and, if necessary, heat-shrink tubing for additional sheathing.
Ready-made solutions save you the crafting effort entirely. An example is an aluminum nano container with small dimensions, around one centimeter, which comes with an integrated magnet and O-ring. Those who want to build their own will find the necessary equipment at Cachewerk, for example, in the Geocache Magnet Construction Workflow, which shows the complete material list and construction process step-by-step.
How to Build a Magnetic Cache Step-by-Step
With good preparation, the actual construction rarely takes longer than an hour, plus curing time for the adhesive. It's important to set up a clean, well-lit workspace beforehand and have all parts ready before applying the adhesive.
- Check container. Inspect the inner dimensions and threads of your container. Does the magnet fit flat inside without the lid jamming?
- Prepare log strip. Cut a waterproof paper strip or use special cache log paper to fit the inner size.
- Position magnet. Place the magnet centrally at the intended spot, usually the bottom or the outer wall of the container. For two magnets, as in the PETling example, glue them opposite each other or stacked, depending on the desired adhesion direction.
- Glue. Apply Pattex Repair Extreme sparingly but evenly. Press the magnet firmly and hold it under light pressure for 30 to 60 seconds.
- Allow to cure. Give the adhesive at least 24 hours, even if the packaging promises a shorter initial bond. Testing too early often causes the magnet to detach again.
- Mechanically secure. Additionally wrap the adhesive joint with sturdy fabric tape. This absorbs stress if the adhesive becomes brittle after months.
- Camouflage. Apply a suitable color or surface texture, depending on whether the cache ends up on a guardrail, a fire hydrant, or a bench.
- First functional test. Gently pull on the magnet, check the fit of the lid, and verify that the log strip can be easily rolled up.
Two 10 by 5 millimeter disc magnets with a combined holding force of about 4.8 kilograms are easily sufficient for most PETling constructions, even with light wind or vibrations from passing vehicles.
A word on safety that you should take seriously: Neodymium magnets of this magnitude can painfully pinch fingers if two pieces snap together unrestrained. When joining two magnets, always hold only one edge, never the entire surface, to prevent them from snapping together abruptly. People with pacemakers or other implanted medical devices should always keep a distance from strong magnets, and credit cards or external hard drives should not be near the workspace during the construction phase.
Pro Tip: Place two thin pieces of cardboard between the magnets as long as you haven't permanently positioned them. This prevents them from snapping together prematurely and pinching your fingers.
If you prefer to visualize the individual construction steps, you can find a detailed overview of container types and mounting variations in the Cachewerk article on Geocaching magnetic containers. Allow one to two days for the entire process, including drying time, even if the actual crafting only takes an hour.
How to Make the Cache Watertight and Weather-Resistant
A cache that swells after the first rain shower brings joy to no one, neither you nor the next finder. The choice of seal determines whether your hide will last weeks or years.
O-rings are excellent for cylindrical metal or plastic containers with screw lids. They are replaceable, inexpensive, and with regular inspection, last several years. Silicone, on the other hand, is used when you have a self-built casing without a precisely fitting groove, for example, a modified PETling. The disadvantage: silicone seams tear over time and need to be reapplied every few months.
When choosing materials for the casing itself, clear differences emerge:
- PETG casing: Lightweight, flexible, good for 3D-printed special shapes, but less pressure-resistant than metal.
- Stainless steel container: Practically indestructible and rust-free, ideal for exposed outdoor locations.
- Aluminum container: Lightweight and robust, but without coating, more susceptible to oxidation than stainless steel.
The magnet itself also needs protection. Standard neodymium magnets are usually nickel-plated, which provides some corrosion protection, but they will still rust eventually with prolonged moisture exposure. A practical recommendation is to place magnets as much as possible inside the container instead of exposing them to the elements. Epoxy-coated magnets last longer but are more expensive and harder to obtain.
For maintenance, it's worth checking three things: rust spots on the magnet, cracks in the silicone seam, and moisture in the log strip. Especially in winter, freezing residual moisture can effectively freeze the lid shut, making it difficult to open and frustrating finders.
Pro Tip: Carry a small silicone stick or a tube of bicycle chain grease during your next cache check. A thin film on the O-ring significantly extends its lifespan and takes you two minutes.
Which Magnet Size Suits Your Cache Type?
The question of the right magnet size arises for every crafter sooner or later, and the answer largely depends on the surface to which the cache will later be attached. A smooth steel guardrail requires less adhesive force than a slightly rough or angled metal surface.
For Nano caches, small disc magnets with 6 to 8 millimeters in diameter are usually sufficient because the total weight of the container is already low. Micro containers with slightly more inherent weight benefit from 8 to 10 millimeter magnets. PETling caches, which carry additional log material and possibly trade items, need the strongest combination, as described in the previously mentioned practical example with two 10 by 5 millimeter disc magnets.
| Magnet Size | Typical Pull Force | Recommended Use |
|---|---|---|
| Ø 6 to 8 mm, 2 mm thick | light, for flat surfaces | Nano cache on smooth steel surface |
| Ø 8 to 10 mm, 3 mm thick | medium, for vertical surfaces | Micro container on lamppost or sign |
| Ø 10 mm, 5 mm thick (two pieces) | strong, approx. 4.8 kg combined pull force | PETling with logbook on guardrail or bench |
When mounting, you have three common options. Gluing on the inside protects the magnet from weathering but slightly reduces the effective adhesive force because a layer of material is in between. Covering the outside with heat-shrink tubing preserves the full pull force but exposes the magnet to the full weather. A complete adhesive tape cover offers a middle ground: it provides slight protection against moisture and can be easily renewed if necessary.
For safety, the same applies here: magnets of this strength can painfully pinch fingers if two pieces snap together unrestrained. It's best to wear gloves when handling them and keep commercial electronics, credit cards, and especially pacemakers at a distance.
Where Can You Place Your Cache?
A magnetic cache is quickly attached, but that's precisely what makes careful site selection more, not less, important. The basic rule is: Do not attach to private property, mailboxes, traffic signs, or other safety-relevant objects without the express permission of the owner.
Before actually hiding, a quick checklist is worthwhile:
- Is the location publicly accessible without finders having to cross a road illegally or enter private property?
- Is there a danger, for example, from traffic, height, or sharp edges at the hiding spot?
- Is the cache placed unobtrusively enough for non-geocachers (so-called muggles)?
- Have you, if necessary, obtained permission from the property owner or the responsible authority?
- Does the logbook size fit the chosen container, so that there is enough space for multiple entries?
National and regional regulations for placement in public spaces differ, and this guide does not replace legal advice in individual cases. If in doubt, obtain an assessment from the responsible municipality or property owner before permanently placing a cache.
For urban hides, certain locations have proven effective: steel guardrails on bicycle paths, metal railings on park benches, or window sills on public buildings often offer sufficient surface area and at the same time enough camouflage through rust, paint patterns, or stickers in the vicinity. Those interested in creative urban solutions can find further ideas in the Cachewerk article on urban hides.
Testing Before Hiding and Maintenance Afterward
Before you place your cache outdoors, three tests are mandatory, not optional. First, the pull test: pull the magnet with moderate force to check if the adhesive bond truly holds. Second, the watertightness test: briefly hold the closed container under running water or immerse it completely for a few seconds, then check the inside for moisture. Third, the opening test: place the cache in the freezer for a few hours and then check if the lid can still be opened easily despite the cold.
- Perform pull test on magnet
- Perform short water test and check interior
- Perform opening test in simulated cold
- Only hide permanently after passing tests
After that, the actual work as an owner begins: maintenance. A regular rhythm helps to identify problems early, rather than learning about them through frustrated finder logs.
- Visual inspection every few months for rust, loose magnets, and cracks in the seal
- Replace log strip if necessary and keep it dry
- Refresh rust protection on the magnet if first spots are visible
- Roughly document replacement intervals for adhesive and O-ring, e.g., in a notes app
In the listing itself, a brief note for finders helps enormously: mention that tweezers are useful and that caution is advised when opening in damp conditions. This prevents frustration and at the same time protects the log strip from unnecessary tearing.
Common Problems and Quick Solutions
If the adhesion decreases, first check three things: Is the magnet too small for the surface, is the surface dirty or rusty, and was the adhesive's curing time really long enough? A second magnet or an additional strip of duct tape often provides a quick fix.
- Water in the container: Dry immediately, replace the O-ring, and prophylactically seal the gasket with silicone.
- Frozen lid: Warm carefully or allow to thaw; never force it open. Add a corresponding note to the listing.
- Magnet lost: Glue in a replacement magnet of the same size and additionally secure the container mechanically with duct tape to prevent recurrence.
Those who want to delve deeper into advanced repair techniques can find further approaches to adhesive selection and long-term security in the Cachewerk article on DIY tips for advanced cachers.
Ready-made products instead of DIY: When is it worth it?
Not everyone wants to solder, glue, and wait three days for curing time. For all those who prefer to get started outdoors right away, Cachewerk offers three ready-made solutions that solve the very problems that DIY projects often fail at.
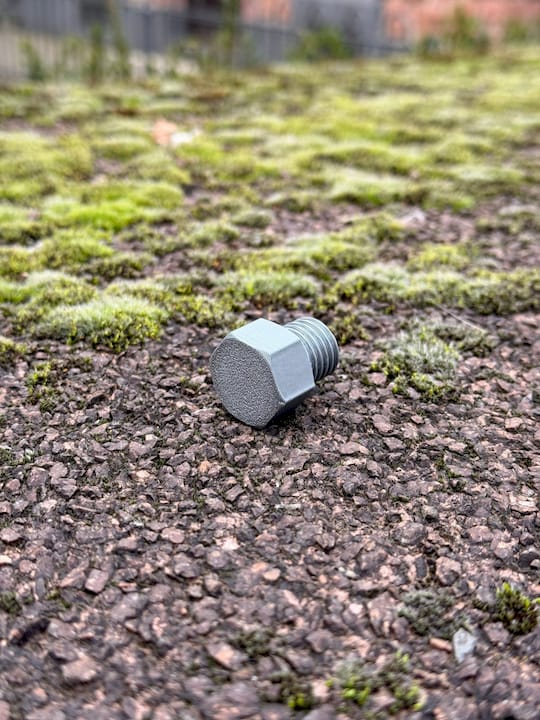
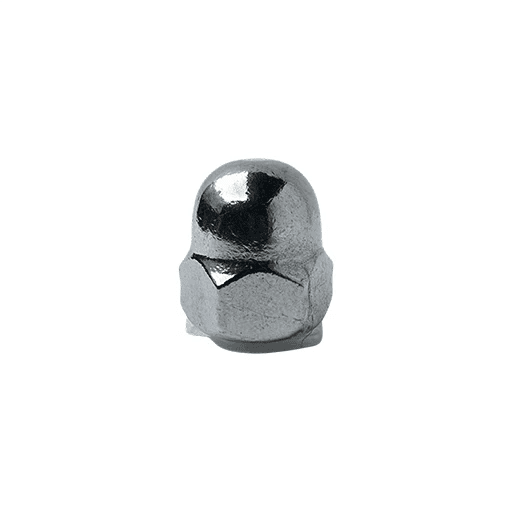
The screw hiding place with a secret compartment and magnet is ideal for inconspicuous nano caches on metal objects because it looks like an ordinary screw from the outside and hides the magnet invisibly inside. For exposed, weather-intensive locations, the stainless steel cap nut cache is the more robust choice because stainless steel practically does not rust and the construction is already designed to be waterproof. Those who need a bit more interior space for a complete logbook should opt for the PETling with a magnetic holder, which is available in camouflage and signal colors and strikes a balance between DIY charm and industrial manufacturing.
Buying instead of building is particularly worthwhile if you lack time, if you depend on tested waterproofing, or if you want to place several caches at once. A ready-made container also saves you the hassle of finding the right adhesive and the waiting time for curing.
Even ready-made products need care: still check the magnet and seal regularly, because wear parts like O-rings wear out over time regardless of whether you built or bought them yourself.
What beginners often underestimate in magnet construction
The most common misconception among beginners is that a strong magnet automatically makes the cache good. In reality, the combination of adhesive selection, curing time, and mechanical securing has a much stronger influence on longevity than pure pulling force in kilograms. A cache with a medium-strength magnet, cleanly glued and additionally secured with duct tape, lasts longer than one with a maximum magnet and hot glue.
Maintenance is also underestimated. Many owners build a cache, hide it, and only check back when finders complain about moisture or icing. A brief visual inspection every few months takes only a few minutes and prevents most failures before they even occur.
My advice for getting started: Start with a PETling, not a Nano. The extra space forgives minor construction errors, and you learn the basic principles of magnets, seals, and camouflage before venturing into the fiddlier Nano formats.
Your entry into magnetic caches with Cachewerk
If, after reading this guide, you prefer to get started immediately instead of first gathering adhesive and magnets individually, Cachewerk offers ready-made solutions that have already solved the problems described here (water-tightness, corrosion, adhesive failure).

Cachewerk offers magnetic hiding places that use tested combinations of magnet size, seal, and material, so you don't have to experiment yourself. For beginners who want to quickly place a first functional cache, the PETling with a magnetic holder is the most pragmatic starting point. If you prefer something particularly inconspicuous, take a look at the screw hiding place. And for locations with a lot of weather exposure, it's worth checking out the stainless steel cap nut cache. Browse the range and choose the model that suits your next hiding place.
Sources
For all those who want to delve deeper into technology and practice, it is worth taking a look at the following resources:
- Magnetic nano - Wikipedia
- CacheQuarter Nano Cache Container, magnetic | Unterwegs
- Supermagnete
- Building a magnetic PETling – DerSchnelleLinus (Blog)