
Urban Cache Guide: Creative Ideas for Exciting Hides
Urban geocaches disappear faster than you'd think. They're either discovered by Muggles (non-geocachers), destroyed by weather, or simply archived because they violate rules. Yet, cities hold so much creative potential. With the right ideas, materials, and a bit of planning, you can build caches that truly delight finders and stay in place for years. This guide shows you step-by-step how to plan, build, place, and maintain an urban cache long-term, without breaking rules or taking unnecessary risks.
Table of Contents
- Planning and Preparation: How to Find the Ideal Spot
- Materials and Tools – What You Need
- Step-by-Step: How to Build and Place Your Urban Cache
- Avoiding Mistakes and Ensuring Quality
- Discover and Create Even More Original Urban Caches
- Frequently Asked Questions
Key Takeaways
| Point | Details |
|---|---|
| Adhere to rules | Avoid prohibited zones and maintain distance from schools, waterways, and animal habitats. |
| Creative materials | Use weather-resistant, inconspicuous containers and camouflage material for your urban cache. |
| Apply expert tips | Test caches on-site, gather community feedback, and keep spare parts ready. |
| Avoid mistakes | Recognize common mistakes and opt for durable solutions. |
Planning and Preparation: How to Find the Ideal Spot
Before you even buy a container, site selection is the most crucial step. A poorly chosen location renders even the most creative cache worthless, as it will either be quickly found, removed, or archived.
The official Geocaching rules are clear: a minimum distance of 150 feet from schools and playgrounds is mandatory. Caches must not be placed in restricted areas, near waterways, or in the vicinity of nesting sites. While this sounds like a lot, in practice, it's less restrictive than you might think.
Furthermore, according to official guidelines, safety and accessibility always take precedence over extreme camouflage. A cache that only a climber can reach is not a good cache. A cache that endangers finders will be archived.
For creative ideas for urban hiding places, it's worth systematically comparing different urban areas. Here's an overview of typical locations:
| Location | Advantages | Disadvantages |
|---|---|---|
| City Park | Natural camouflage, plenty of space | High Muggle frequency on weekends |
| Street sign or lamppost | Inconspicuous, easily accessible | Maintenance work can remove cache |
| Public square | Central, easily accessible | Little camouflage, surveillance cameras possible |
| Industrial area | Few Muggles, many hiding opportunities | Restricted access, safety risks |
| Bridge or underpass | Good camouflage, interesting atmosphere | Check proximity to waterways |
The following criteria help with site selection:
- Accessibility: Can every finder safely reach the cache, even without special equipment?
- Visibility: How high is the risk of being observed during hiding or searching?
- Stability: Will the location undergo structural changes in the coming years?
- Compliance: Are all distances and restricted zones adhered to?
A quick visit during peak hours will quickly show you if a location is truly suitable. Observe how many people pass by and if there are natural screening points.
Materials and Tools – What You Need
The choice of materials determines whether your cache lasts six months or six years. Especially in the city, the stress is high: temperature fluctuations, moisture, vandalism, and curious hands demand robust solutions.

The basic principle is: accessibility and rule compliance are more important than maximum camouflage. A cache made of cheap plastic that swells after the first winter and can no longer be opened frustrates finders and quickly ends up on the archiving list.
Here's an overview of proven materials for urban caches:
| Material | Suitability for city | Durability | Special feature |
|---|---|---|---|
| PETG plastic (3D printing) | Very good | High | Flexible in shape, weather-resistant |
| Stainless steel | Good | Very high | Heavy, but extremely robust |
| Magnetic container | Very good | Medium to high | Ideal for metal surfaces |
| PVC pipe with lid | Good | High | Inexpensive, easy to build |
| Standard cans (plastic) | Conditional | Low to medium | Only usable with a seal |
For construction and maintenance, you also need:
- Weatherproof adhesive or silicone for seals
- Drill and screws for permanent mounting
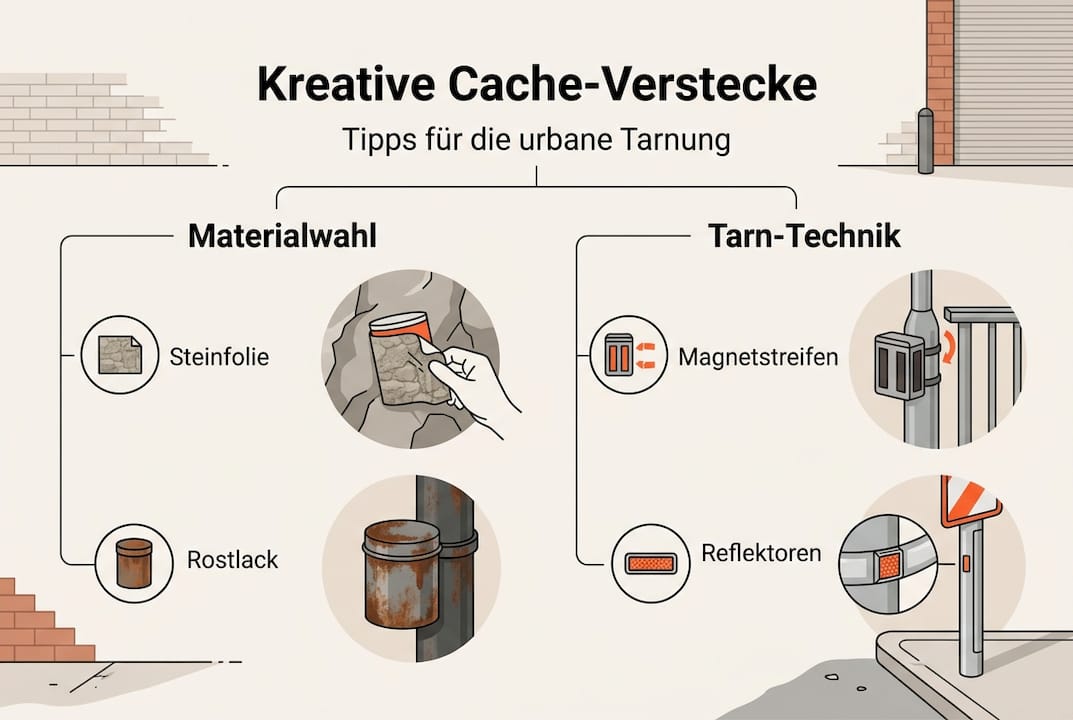
- Weatherproof paint or film for camouflage
- Magnetic paint for special camouflage effects on metal surfaces
- Sealing rings for all containers with screw caps
- Logbook and pencil in a waterproof cover
For material tips for geocaching, it's worth looking at specialized sources that specifically address urban requirements.
Pro Tip: Always bring spare seals, a fresh logbook, and some adhesive on every maintenance trip. Urban locations are more exposed to weather and human interference than forest caches. Being prepared saves you a second trip.
An often underestimated detail: camouflage. Reflective stickers, stone-look film, or rust-effect paint can make a cache almost invisible without requiring elaborate constructions. Always remember that the camouflage must match the surroundings. A green-painted container on a gray concrete wall will immediately stand out.
Step-by-Step: How to Build and Place Your Urban Cache
Now to the nitty-gritty. With the right materials and a clear plan, you can implement your cache in a structured and secure way. Here's the proven approach:
- Create a concept and sketch: Consider what kind of cache you want to build. Nano cache, magnetic hide, fake object, or classic container? Sketch the design and the planned location.
- Select and procure materials: Based on the location and concept, choose the appropriate materials. Magnets are suitable for metal surfaces, while stone-look containers are better for natural stone walls.
- Build and test the cache: Assemble the cache completely at home. Test its watertightness with water, check if the logbook fits, and if the closure works even with wet hands.
- Apply camouflage: Adapt the color, film, or texture to the planned location. Take photos of the location and compare them with the finished cache.
- Finally check the location: Visit the location again and check all distances to schools and waterways. Pay attention to current construction sites or changes.
- Check rules and permits: Clarify whether you need a permit for the location. Some parks or municipalities require written permission.
- Place and list the cache: Carefully place the cache and list it on the Geocaching platform with precise coordinates and a clear description.
For instructions on building creative cache types, you'll find more inspiration and detailed guides for various cache variants.
Pro Tip: First test your construction instructions at a test site, for example in your own garden or a quiet park area. This way, you can identify weaknesses before the cache is officially listed.
Important Note: Rule violations lead directly to your cache being archived. Once archived, the effort for a relisting is considerable. Therefore, carefully check each step before publishing the cache.
After placement, regular maintenance is mandatory. Plan a check-up visit at least every three months. Check the condition of the container, replace the logbook, and ensure that the camouflage is still intact. A well-maintained cache receives better ratings and remains active longer.
Avoiding Mistakes and Ensuring Quality
Even experienced geocachers make typical mistakes when building urban hides. The good news: most can be avoided with a little prior knowledge.
Here are the most common problems:
- Wrong camouflage: The cache doesn't visually match the surroundings and immediately stands out.
- Unsuitable container: Cheap plastic swells, lids can no longer be opened, moisture gets in.
- Rule violations: Cache is too close to a school, playground, or body of water.
- Too obvious mounting: Screws, tape, or fresh paint reveal the location.
- Lack of maintenance: The logbook is soaked, the container damaged, finders leave negative reviews.
Particularly important: Local rules can be stricter than general geocaching guidelines. Some cities and parks completely prohibit caches near bodies of water or wildlife areas. Always inquire with the responsible municipality or park office.
Here's a direct comparison of what works long-term and what doesn't:
| Approach | Long-term successful | Long-term problematic |
|---|---|---|
| Weather-resistant PETG container | Yes, lasts years | No |
| Cheap plastic container without seal | No | Yes, swells up |
| Camouflage matching the surroundings | Yes, remains inconspicuous | No |
| Bright colors or visible attachment | No | Yes, quickly discovered |
| Regular maintenance every 3 months | Yes, maintains quality | No |
| Location without permission | No | Yes, archiving risk |
For common mistakes in urban hides, it's worth checking community forums and experience reports from other geocachers.
Pro Tip: Ask two or three experienced geocachers from your area to test your cache before it's officially listed. Their feedback will show you if the camouflage works, if the cache is easy enough to open, and if the location seems safe. Community feedback is the best quality assurance tool you can use for free.
One final quality check before listing: Place the container in a bucket of water for 24 hours. If there's moisture inside afterward, you need to improve the seal. This simple test will save you many maintenance trips later.
Discover and Create Even More Original Urban Caches
You now have the knowledge to professionally plan, build, and maintain your own urban cache. But sometimes, you need the right piece of equipment to truly bring an idea to life.
At cachewerk.de, you'll find exactly what makes urban caches special. The camouflage traffic sign for caches is a perfect example: it looks like a real sign but is a cleverly designed hide that blends seamlessly into the cityscape. If you're looking for more ideas, the Geocaching accessories offer a wide selection of camouflage tools, containers, and specialized parts for urban challenges. All products are designed for durability and compliance, ensuring your cache remains active for a long time and truly delights finders.
Frequently Asked Questions
What rules apply specifically to urban geocaches?
Caches must be at least 150 feet away from schools and playgrounds and cannot be placed in restricted zones, near waterways, or in nesting areas. Local authorities may impose additional restrictions.
What mistakes should I avoid with urban caches?
Avoid locations near water, animal habitats, and highly frequented places without natural camouflage. Local rules may completely prohibit caches in certain areas, so always research in advance.
Are there recommended containers for the city?
Robust, weather-resistant containers made of PETG or stainless steel, as well as magnetic nano-caches, are particularly well-suited for urban locations because they can withstand temperature fluctuations and moisture.
How do I increase the longevity of my urban cache?
Regular maintenance every three months, high-quality materials with good sealing, and actively seeking community feedback ensure that your cache remains active and in good condition for a long time.