
Creative Geocaching DIY Ideas: The Best Hiding Tips
TL;DR:
- Creative and suitable locations and stories increase a geocache's popularity.
- 3D printing enables cost-effective, versatile hides like nano or bolt caches.
- Success lies in the combination of location, story, and camouflage, not just the container.
Anyone who has searched for hundreds of caches knows the feeling: another green film canister under a rock. Standard hides are reliable, but they no longer excite anyone. Yet, geocaching holds so much creative potential. Whether you want to place your first cache or take your existing hide to the next level: with the right DIY ideas and some planning, you can create experiences that finders will remember for a long time. In this article, you'll get concrete instructions, honest comparisons, and tested practical tips for inspiring geocache hides.
Table of Contents
- Criteria for Inspiring Geocache Hides
- DIY Hides with 3D Printing: Affordable and Versatile
- More DIY Ideas: Camouflage Hides, Fake Rocks, and Mechanical Containers
- Comparison of Hide Types: Durability, Cost, and Difficulty
- Our View: What Truly Makes a Favorite Geocache
- Discover Geocaching Accessories and Perfect DIY Projects
- Frequently Asked Questions
Key Insights
| Point | Details |
|---|---|
| DIY saves costs | 3D printing and smart crafting ideas significantly reduce expenses for geocache hides. |
| Creativity pays off | Geocaches with original ideas and storytelling receive the most favorite points. |
| Variety for every level | From simple fake rocks to complex puzzle containers, there's inspiration for all experience levels. |
| Platforms facilitate entry | Online portals like Thingiverse provide numerous free models for geocachers. |
Criteria for Inspiring Geocache Hides
Now that we've roughly outlined how the world of geocaches can change, let's look at the selection criteria for the perfect, creative geocache. Not every original hide automatically becomes a favorite. It takes a well-thought-out combination of several factors for finders to be truly excited.
The most important criteria at a glance:
- Story and Location: The cache should fit the surroundings and tell a story. A hide in a historic place with appropriate content is much more impactful than a randomly placed container.
- Material Choice: Weather resistance is a must. Untreated wood rots, thin plastic breaks in frost. Opt for PETG, ABS, or coated wood.
- Camouflage: A well-camouflaged hide significantly increases the fun factor. Color, texture, and shape must match the surroundings.
- Interactivity: Mechanical elements, puzzles, or multi-stage openings create genuine "aha!" moments.
- Sustainability: Use materials that don't harm nature. Avoid foams or materials that decompose and leave microplastics.
- Accessibility: Even a spectacular hide must be findable. Overly difficult mechanics frustrate more than they delight.
Empirical data confirm this approach: Top caches with 2000 to 7000 FavPoints consistently show a strong synergy of story and location. This is no coincidence, but the result of conscious planning.
Further Geocaching DIY tips will help you put these criteria into practice and develop your own cache step-by-step.
Pro Tip: Sometimes a simple idea, perfectly executed, is enough. A small magnetic nano in the right spot with a witty logbook message beats any half-baked puzzle box. Quality of execution trumps complexity.
DIY Hides with 3D Printing: Affordable and Versatile
With these criteria in mind, let's dive into the world of 3D-printed DIY hides, which have seen an enormous surge in popularity in recent years. The reason is simple: with a 3D printer and a little creativity, individual containers of any shape and size can be produced that no store offers.
The most popular types at a glance:
- Bolt Caches: Look like real bolts and fit perfectly on metal fences or benches. Hard to spot for muggles.
- Nano Caches: Tiny magnetic containers that stick to metal posts or under benches. Ideal for urban hides.
- Pen Caches: Deceptively real ballpoint pens with a logbook inside. Perfect for city caches.
- Tree Stump Imitations: Larger containers with a tree bark look for forest hides.
- Puzzle Boxes: Multi-part containers with mechanisms that can only be opened after solving a puzzle.
The cost savings are enormous. 3D-printed micros cost 0.15 to 0.50 Euros each, while comparable purchased products often cost several Euros. Overall, 3D printing saves 80 to 90 percent compared to bought containers.
| Type | Material | Cost per Piece | Printing Difficulty |
|---|---|---|---|
| Bolt Cache | PETG | approx. €0.30 | Medium |
| Nano Cache | PLA | approx. €0.15 | Easy |
| Pen Cache | PETG | approx. €0.40 | Medium |
| Tree Stump | PETG/ABS | approx. €1.50 | High |
| Puzzle Box | PLA/PETG | approx. €0.80 | High |
You can find templates on platforms like Thingiverse, which offers more than 2500 geocaching models for free. For beginners, simple nano designs are recommended, as they can be printed quickly and put into use immediately. Detailed 3D printing instructions for geocaching will help you find the right settings for waterproof layers.
A small tip for personalization: stick suitable geocaching container stickers on your container to make your cache unique and bring a smile to finders' faces.
Pro Tip: Reduce material consumption during printing by lowering the infill percentage to 10 to 15 percent and instead printing more wall layers (4 to 5 perimeters). This saves filament but significantly increases the stability of the outer walls.
More DIY Ideas: Camouflage Hides, Fake Rocks, and Mechanical Containers
Not everyone has access to a 3D printer. Therefore, here are ideas that shine with simple tools and proven crafting techniques. These methods can often be integrated into the environment even more naturally than printed parts.
-
Pseudo Birdhouse: Build a small wooden birdhouse and attach a PETling inside as the actual cache container. The bottom remains open so finders can remove the container. With weatherproof paint and some moss, it looks deceptively real. This construction has proven itself for over 1.5 years according to practical tests and withstands harsh winters without problems.
-
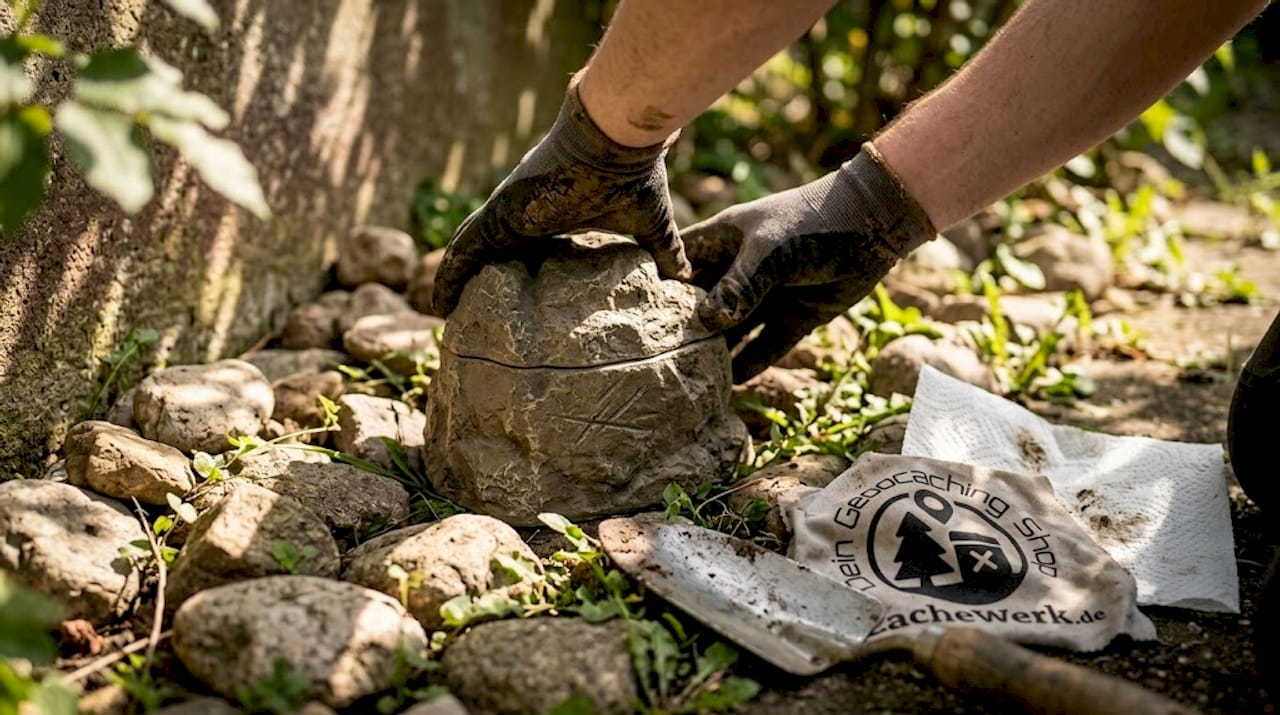
Fake Rocks: Form a rock from cement or papier-mâché, paint it with acrylic paint, and embed real pebbles into the surface while the mass is still soft. The result is hardly distinguishable from real rocks. This method is inexpensive, fast, and requires no special tools.
-
Mechanical Containers with LEGO Mechanics: Build a container that only opens when the finder presses a certain lever or moves a slider. LEGO Technic parts are excellent as a base because they are precise and stable. These hides create genuine moments of surprise.
-
Magnetic Nanos for Urban Hides: Small magnets and a tiny container are enough to attach an invisible cache to a metal post. Hard to beat for city caches.
“The best hides combine camouflage and mechanics. Those who combine both almost always get the most favorite points.”
The alternative DIY geocaching ideas show that creativity doesn't require expensive materials. Often, it's the simplest ideas that inspire the most.
Pro Tip: Combine mechanics and camouflage for maximum effect. A fake rock that only opens after turning is more memorable than a pure camouflage hide or a pure mechanism.
Comparison of Hide Types: Durability, Cost, and Difficulty
Now that all important hide variations are on the table, let's explore which DIY model is truly suitable for which application. Not every method fits every location or budget.
| Hide Type | Durability | Cost | Construction Difficulty | Best Use Location |
|---|---|---|---|---|
| 3D-Printed Nano | 2 to 3 years | Very low | Easy | City caches, metal posts |
| 3D-Printed Bolt Cache | 3 to 5 years | Low | Medium | Fences, benches, urban areas |
| Pseudo Birdhouse | 3 to 5 years | Medium | Medium | Forest edge, gardens |
| Fake Rock | 2 to 4 years | Low | Easy | Forest paths, rock formations |
| Mechanical LEGO Cache | 1 to 2 years | Medium | High | Covered locations, dry |
| Magnetic Nano | 1 to 2 years | Very low | Very easy | City caches, metal |
The table shows: 3D-printed bolt caches and pseudo birdhouses are the most durable options. Magnetic nanos are the easiest to build but need to be checked more often.
Quick decision-making aid:
- No 3D printer available: Fake rock or pseudo birdhouse are the best alternatives.
- Low budget: Magnetic nano or 3D-printed nano are the cheapest options.
- Maximum durability desired: 3D print from PETG or pseudo birdhouse made of treated wood.
- Highest fun factor: Mechanical container or puzzle box for unforgettable finder experiences.
- City cache planned: Bolt cache or magnetic nano blend inconspicuously into urban environments.
The Geocaching blueprints overview provides detailed step-by-step instructions for each of these types, so you can get started right away. Important: Always test your hide for waterproofness and findability yourself before placing it.
Our View: What Truly Makes a Favorite Geocache
After comparing all methods, let's reflect on what truly matters from a practical perspective. We see it repeatedly: geocachers invest hours in elaborate containers but receive few favorite points. And then there are caches with a simple film canister that collect hundreds of favorites.
What makes the difference? It's almost always the combination of location and story. A cache at a viewpoint with a personal note from the owner explaining why this place is special beats any technical masterpiece. Top caches with up to 7000 FavPoints almost without exception demonstrate this synergy.
The uncomfortable truth: crafting skills alone rarely earn favorite points. A mediocre container with a great experience surpasses a perfect puzzle box in a boring location. This doesn't mean that quality is irrelevant. But priorities should be straight: first the location, then the story, then the container.
Anyone who wants to share their own geocaching experience and inspire others should ask themselves: What makes this place special? The answer to this question is the core of every great cache.
Discover Geocaching Accessories and Perfect DIY Projects
With these perspectives, our overview concludes, and we show where to go next with DIY and tools. You now have the criteria, the ideas, and the direct comparison. The next step is implementation.
At cachewerk.de, you'll find everything you need for your DIY projects: weatherproof containers, camouflage materials, magnetic attachments, and much more. Browse our geocaching accessories and discover products that will take your hides to the next level. For those who want to dive even deeper: our instructions for building DIY geocaches provide you with concrete blueprints and material recommendations for every type. Get inspired and place your next favorite cache!
Frequently Asked Questions
Which DIY Cache Type Is the Most Durable?
Pseudo birdhouses and 3D-printed bolt caches are considered particularly weatherproof and low-maintenance, as they are made of treated wood or PETG and effectively repel moisture.
How Much Cheaper Are Self-Printed Geocache Containers?
With 3D printing, you save 80 to 90 percent compared to purchased containers, as a micro-cache only costs 0.15 to 0.50 Euros in filament.
Where Can I Find Templates for 3D-Printed Geocaches?
Thingiverse offers over 2500 models for geocaching hides for free download, from simple nanos to complex puzzle boxes.
Which DIY Idea Is Suitable for a Beginner Project?
A magnetic nano or fake rock made from simple materials is ideal for beginners, as both types can be implemented without special tools and on a low budget.